TOC
写在开头
在istio1.8之前,istio集群模式需要依赖都需要依赖ingressgateway的支持,并且在不同群集上运行的Pod通过Istio Ingress网关进行通信。请注意,每个Istio控制平面仅与在同一群集上运行的Kubernetes API服务器通信,而且依赖istiocoredns来解析.global的地址。在istio1.8之后,istiocoredns完全废弃,并由istio-proxy的sidecar完成dns解析。以及在同网络不同集群下不需要ingressgateway的支持,k8s的svc能够自动发现两个集群的pod ip,且格式保持和单集群一致,为:svcname.namespace.svc.cluster.local。并不像istio1.8之前用global做后缀。
关于istio1.18中sidecar dns代理实现参考:https://www.ipyker.com/post/istiod-smart-dns-proxy
下面说说目前最新istio 1.9.2的同网络多k8s集群多主istio控制面的联邦。
Isito1.16 集群参考:https://www.ipyker.com/post/istio1_16_mutil_primary/
多主模式架构
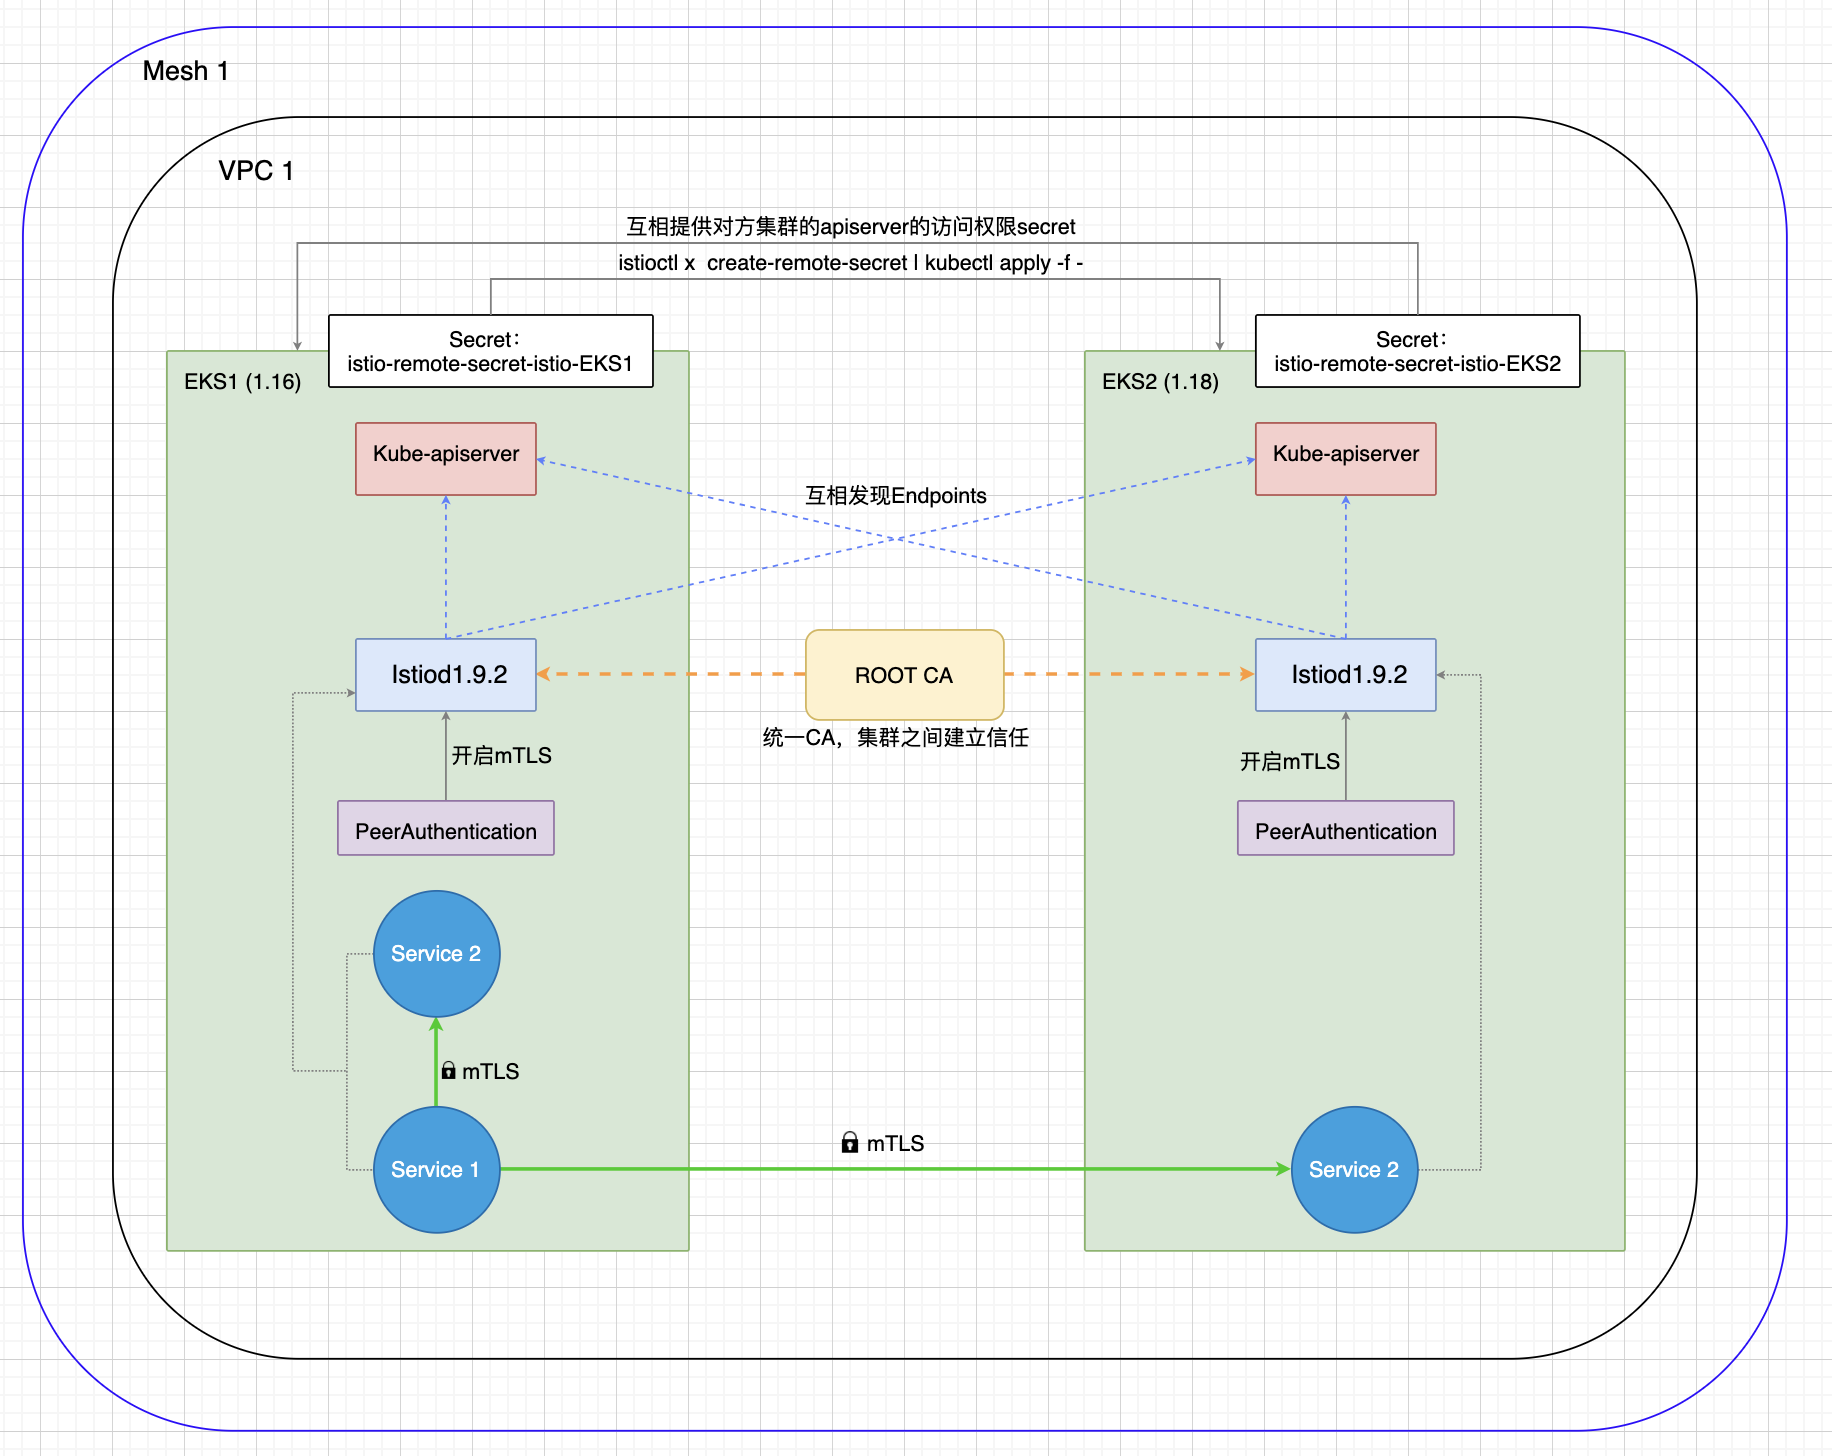 由于同网络(VPC),所以不同集群上运行的Pod可以直接通信,并且Istio控制平面现在可以发现其他集群上运行的工作负载(通过访问远程Kubernetes API服务器)。
更多架构参考官方:https://istio.io/latest/zh/docs/setup/install/multicluster/
架构解析
- Istiod使用共同ROOT CA签发的中间证书来安装Istiod,从而确认彼此之间的信任关系。
- 每个集群生成istiod对apiserver的kubeconfig文件,使用secret封装起来,然后在对方集群apply,从而使其能watch对方集群资源。
- 配置PeerAuthentication,从而启用Istio的mTLS。因为跨集群必须mTLS通信。
- 部署服务后,通过svcname即可发现所有的endpoints对象,从而达到跨集群调度。
⚠️ 必须保证同一个网络下,且PodIP互相通信!
部署前准备
- 准备好2个Kubernetes集群,注意两个集群的apiserver需要能互相访问
- 准备好一份CA证书,可以是openssl自签发的。
- 本文准备了两个Kubernetes集群,名称分别为
istio-cluster-001和istio-cluster-002
当前操作主机拥有两个集群的权限,因此有些公共资源部分省去了copy后在apply的步骤。
部署证书
在安装istio之前,需要先部署一个cacerts的secret资源。可以使用openssl生成ca证书和中间证书。然后部署到k8s,包括所有输入文件ca-cert.pem,ca-key.pem, root-cert.pem和cert-chain.pem
# istio-cluster-001 部署证书
$ kubectl --kubeconfig=/root/.kube/istio-cluster-001 create namespace istio-system
$ kubectl --kubeconfig=/root/.kube/istio-cluster-001 create secret generic cacerts -n istio-system \
      --from-file=./ca-cert.pem \
      --from-file=./ca-key.pem \
      --from-file=./root-cert.pem \
      --from-file=./cert-chain.pem

# istio-cluster-002 部署证书
$ kubectl --kubeconfig=/root/.kube/istio-cluster-002 create namespace istio-system
$ kubectl --kubeconfig=/root/.kube/istio-cluster-002 create secret generic cacerts -n istio-system \
      --from-file=./ca-cert.pem \
      --from-file=./ca-key.pem \
      --from-file=./root-cert.pem \
      --from-file=./cert-chain.pem
此证书已经生成好的,两个集群可以用同一个中间证书,也可以用ROOT CA分别签发两个集群的证书,详细步骤参考:https://istio.io/latest/docs/tasks/security/cert-management/plugin-ca-cert/
安装Istiod
准备IstioOperator安装配置文件,集群1和集群2参考下面配置,注意注释部分中的解释。
apiVersion: install.istio.io/v1alpha1
kind: IstioOperator
spec:
  components:
    base:
      enabled: true
    cni:
      enabled: false
    egressGateways:
    - enabled: false
      name: istio-egressgateway
    ingressGateways:
    - enabled: true
      k8s:
        resources:
          requests:
            cpu: 30m
            memory: 100Mi
      name: istio-ingressgateway
    istiodRemote:
      enabled: false
    pilot:
      enabled: true
      k8s:
        resources:
          requests:
            cpu: 30m
            memory: 100Mi
        env:
        - name: PILOT_TRACE_SAMPLING          # trace采样精度,最小单位0.1,不需要链路跟踪可以关掉优化性能
          value: "80"
        hpaSpec:
          maxReplicas: 5
          minReplicas: 1
  hub: docker.io/istio
  meshConfig:
    accessLogFile: /dev/stdout
    defaultConfig:
      proxyMetadata:                           # 此段配置envoy dns解析
        ISTIO_META_DNS_CAPTURE: "true"
        ISTIO_META_PROXY_XDS_VIA_AGENT: "true"
    enablePrometheusMerge: true
  profile: default
  tag: 1.9.2
  values:
    base:
      enableCRDTemplates: false
      validationURL: ""
    gateways:
      istio-egressgateway:
        autoscaleEnabled: true
        env: {}
        name: istio-egressgateway
        secretVolumes:
        - mountPath: /etc/istio/egressgateway-certs
          name: egressgateway-certs
          secretName: istio-egressgateway-certs
        - mountPath: /etc/istio/egressgateway-ca-certs
          name: egressgateway-ca-certs
          secretName: istio-egressgateway-ca-certs
        type: ClusterIP
        zvpn: {}
      istio-ingressgateway:
        autoscaleEnabled: true
        env: {}
        name: istio-ingressgateway
        secretVolumes:
        - mountPath: /etc/istio/ingressgateway-certs
          name: ingressgateway-certs
          secretName: istio-ingressgateway-certs
        - mountPath: /etc/istio/ingressgateway-ca-certs
          name: ingressgateway-ca-certs
          secretName: istio-ingressgateway-ca-certs
        type: LoadBalancer
        zvpn: {}
    global:
      arch:
        amd64: 2
        ppc64le: 2
        s390x: 2
      configValidation: true
      podDNSSearchNamespaces:            # 不同网络下多集群使用。本环境用不上
        - global
        - "{{ valueOrDefault .DeploymentMeta.Namespace \"default\" }}.global"
      defaultNodeSelector: {}
      defaultPodDisruptionBudget:
        enabled: true
      defaultResources:
        requests:
          cpu: 10m
      imagePullPolicy: ""
      imagePullSecrets: []
      istioNamespace: istio-system
      istiod:
        enableAnalysis: false
      jwtPolicy: third-party-jwt
      logAsJson: false
      logging:
        level: default:info
      meshNetworks: {}
      mountMtlsCerts: false
      meshID: mesh1                        # 两个集群都必须配置且一样
      multiCluster:
        clusterName: "istio-cluster-001"   # 分别填写两个集群的名字
        enabled: true
      network: "network1"                  # 两个集群都必须配置且一样
      omitSidecarInjectorConfigMap: false
      oneNamespace: false
      operatorManageWebhooks: false
      pilotCertProvider: istiod
      priorityClassName: ""
      proxy:
        autoInject: enabled
        clusterDomain: cluster.local
        componentLogLevel: misc:error
        enableCoreDump: false
        excludeIPRanges: ""
        excludeInboundPorts: ""
        excludeOutboundPorts: ""
        image: proxyv2
        includeIPRanges: '*'
        logLevel: warning
        privileged: false
        readinessFailureThreshold: 30
        readinessInitialDelaySeconds: 1
        readinessPeriodSeconds: 2
        resources:
          limits:
            cpu: 2000m
            memory: 1024Mi
          requests:
            cpu: 100m
            memory: 128Mi
        statusPort: 15020
        tracer: zipkin
      proxy_init:
        image: proxyv2
        resources:
          limits:
            cpu: 2000m
            memory: 1024Mi
          requests:
            cpu: 10m
            memory: 10Mi
      sds:
        token:
          aud: istio-ca
      sts:
        servicePort: 0
      tracer:
        datadog: {}
        lightstep: {}
        stackdriver: {}
        zipkin: {}
      useMCP: false
    istiodRemote:
      injectionURL: ""
    pilot:
      autoscaleEnabled: true
      autoscaleMax: 5
      autoscaleMin: 1
      configMap: true
      cpu:
        targetAverageUtilization: 80
      enableProtocolSniffingForInbound: true
      enableProtocolSniffingForOutbound: true
      env: {}
      image: pilot
      keepaliveMaxServerConnectionAge: 30m
      nodeSelector: {}
      replicaCount: 1
      traceSampling: 1
    telemetry:
      enabled: true
      v2:
        enabled: true
        metadataExchange:
          wasmEnabled: false
        prometheus:
          enabled: true
          wasmEnabled: false
        stackdriver:
          configOverride: {}
          enabled: false
          logging: false
          monitoring: false
          topology: false
安装Isitod
$ istioctl --kubeconfig=/root/.kube/istio-cluster-001 install -f istio-cluster-001-iop.yaml
$ istioctl --kubeconfig=/root/.kube/istio-cluster-002 install -f istio-cluster-002-iop.yaml
启用跨集群发现EndPoint
集群分别安装对方的secret。
$ istioctl --kubeconfig=/root/.kube/istio-cluster-001  x create-remote-secret --name istio-cluster-001 | \
  kubectl --kubeconfig=/root/.kube/istio-cluster-002 apply -f -

$ istioctl --kubeconfig=/root/.kube/istio-cluster-002  x create-remote-secret --name istio-cluster-002 | \
  kubectl --kubeconfig=/root/.kube/istio-cluster-001 apply -f -
启用双向mTLS
如果需要整个集群启动双向tls,则名称空间填写istio-system
$ kubectl --kubeconfig=/root/.kube/istio-cluster-001 apply -f - <<EOF
apiVersion: "security.istio.io/v1beta1"
kind: "PeerAuthentication"
metadata:
  name: default
  namespace: sample
spec:
  mtls:
    mode: STRICT
EOF

$ kubectl --kubeconfig=/root/.kube/istio-cluster-002 apply -f - <<EOF
apiVersion: "security.istio.io/v1beta1"
kind: "PeerAuthentication"
metadata:
  name: default
  namespace: sample
spec:
  mtls:
    mode: STRICT
EOF
至此多主istio集群部署完毕,下面开始验证。
验证跨集群访问
目标:将在istio-cluster-001集群部署HelloWorld的V1版本和在istio-cluster-002集群部署V2版本。收到请求后,HelloWorld将在其响应中包含其版本。
另外还将Sleep容器部署到两个集群中。我们将使用sleep Pod作为对HelloWorld服务的请求的源,模拟网内流量。最后,在产生流量之后,我们将观察哪个集群接收到了请求。
部署helloworld
$ hellworld_url='https://raw.githubusercontent.com/istio/istio/release-1.9/samples/helloworld/helloworld.yaml'
$ kubectl --kubeconfig=/root/.kube/istio-cluster-001 create ns sample
$ kubectl --kubeconfig=/root/.kube/istio-cluster-001 label ns sample istio-injection=enabled
$ kubectl --kubeconfig=/root/.kube/istio-cluster-002 create ns sample
$ kubectl --kubeconfig=/root/.kube/istio-cluster-002 label ns sample istio-injection=enabled
$ kubectl --kubeconfig=/root/.kube/istio-cluster-001 apply -f $hellworld_url -l version=v1 -n sample          # 部署hellword deploy v1版本到k1集群
$ kubectl --kubeconfig=/root/.kube/istio-cluster-002 apply -f $hellworld_url -l version=v2 -n sample          # 部署hellword deploy v2版本到k2集群
$ kubectl --kubeconfig=/root/.kube/istio-cluster-001 apply -f $hellworld_url -l service=helloworld -n sample  # 部署svc
$ kubectl --kubeconfig=/root/.kube/istio-cluster-002 apply -f $hellworld_url -l service=helloworld -n sample
部署sleep
$ kubectl --kubeconfig=/root/.kube/istio-cluster-001 apply -f https://raw.githubusercontent.com/istio/istio/release-1.9/samples/helloworld/helloworld.yaml -n sample
$ kubectl --kubeconfig=/root/.kube/istio-cluster-002 apply -f https://raw.githubusercontent.com/istio/istio/release-1.9/samples/helloworld/helloworld.yaml -n sample
确认pod svc正常
$ kubectl --kubeconfig=/root/.kube/istio-cluster-001 get pod,svc -n sample -owide
NAME                                READY   STATUS    RESTARTS   AGE   IP              NODE                                               NOMINATED NODE   READINESS GATES
pod/helloworld-v1-bb85789c4-rfrl8   2/2     Running   0          81m   172.31.7.36     ip-172-31-1-97.ap-southeast-1.compute.internal     <none>           <none>
pod/sleep-7c47764b7-px9jj           2/2     Running   0          81m   172.31.45.201   ip-172-31-40-247.ap-southeast-1.compute.internal   <none>           <none>

NAME                 TYPE        CLUSTER-IP     EXTERNAL-IP   PORT(S)    AGE   SELECTOR
service/helloworld   ClusterIP   10.100.74.29   <none>        5000/TCP   82m   app=helloworld
service/sleep        ClusterIP   10.100.73.25   <none>        80/TCP     82m   app=sleep
###############################
$ kubectl --kubeconfig=/root/.kube/istio-cluster-002 get pod,svc -n sample -owide
NAME                                READY   STATUS    RESTARTS   AGE   IP              NODE                                              NOMINATED NODE   READINESS GATES
pod/helloworld-v2-76c59fb8c-brztk   2/2     Running   0          81m   172.31.23.141   ip-172-31-30-29.ap-southeast-1.compute.internal   <none>           <none>
pod/sleep-78cf8b5f6b-pdkmw          2/2     Running   0          81m   172.31.39.21    ip-172-31-42-44.ap-southeast-1.compute.internal   <none>           <none>

NAME                 TYPE        CLUSTER-IP       EXTERNAL-IP   PORT(S)    AGE   SELECTOR
service/helloworld   ClusterIP   10.100.227.4     <none>        5000/TCP   82m   app=helloworld
service/sleep        ClusterIP   10.100.101.254   <none>        80/TCP     82m   app=sleep
进入sleep容器验证
$ kubectl --kubeconfig=/root/.kube/istio-cluster-001 exec -it sleep-7c47764b7-px9jj -c sleep -n sample -- sh
pod/ $ for i in `seq 10`;do curl -sS helloworld.sample:5000/hello;done  # 执行10次访问,查看结果。可以发现分别请求到了v1和v2。则跨集群成功。
Hello version: v2, instance: helloworld-v2-76c59fb8c-brztk
Hello version: v1, instance: helloworld-v1-bb85789c4-rfrl8
Hello version: v2, instance: helloworld-v2-76c59fb8c-brztk
Hello version: v1, instance: helloworld-v1-bb85789c4-rfrl8
Hello version: v1, instance: helloworld-v1-bb85789c4-rfrl8
Hello version: v2, instance: helloworld-v2-76c59fb8c-brztk
Hello version: v1, instance: helloworld-v1-bb85789c4-rfrl8
Hello version: v2, instance: helloworld-v2-76c59fb8c-brztk
Hello version: v1, instance: helloworld-v1-bb85789c4-rfrl8
Hello version: v2, instance: helloworld-v2-76c59fb8c-brztk
同理进入k2集群的sleep去访问也一样的效果。
中间涉及到的验证
mtls证书验证
在未启用Istio双向TLS时,跨集群不通过,因为跨集群必须使用mtls通信,默认为permissive,允许非mtls的流量。
- 在执行
启动双向mTLS步骤前,并未发现ca。
$ kubectl --kubeconfig=/root/.kube/istio-cluster-002  exec helloworld-v2-76c59fb8c-brztk -c istio-proxy -n sample -- openssl s_client -showcerts -connect helloworld:5000
write:errno=104
CONNECTED(00000005)
---
no peer certificate available
---
No client certificate CA names sent
---
SSL handshake has read 0 bytes and written 312 bytes
Verification: OK
---
New, (NONE), Cipher is (NONE)
Secure Renegotiation IS NOT supported
Compression: NONE
Expansion: NONE
No ALPN negotiated
Early data was not sent
Verify return code: 0 (ok)
在执行了启动双向mTLS步骤后,可以顺利发现证书,且由于都是root ca签发的证书,所以根证书都一样。
   # 下面证书部分略过
   $ kubectl --kubeconfig=/root/.kube/istio-cluster-002 exec helloworld-v2-76c59fb8c-brztk -c istio-proxy -n sample -- openssl s_client -showcerts -connect helloworld:5000
   depth=2 O = Istio, CN = Root CA
   verify error:num=19:self signed certificate in certificate chain
   CONNECTED(00000005)
   ---
   Certificate chain
    0 s:
      i:O = Istio, CN = Intermediate CA, L = book-test
   -----BEGIN CERTIFICATE-----
   MIIEZTCCAk2gAwIBAgIQGTmDhF/+LZcAV5maiuKk2zANBgkqhkiG9w0BAQsFADA+
   ...
   ds5x2GhkchhHcLW4d+bUAO+xG9O5MY1MRg==
   -----END CERTIFICATE-----
    1 s:O = Istio, CN = Intermediate CA, L = book-test
      i:O = Istio, CN = Root CA
   -----BEGIN CERTIFICATE-----
   MIIFmzCCA4OgAwIBAgICAYEwDQYJKoZIhvcNAQELBQAwIjEOMAwGA1UECgwFSXN0
   ...
   ARfBl7meBhCA659nXQ839sQ/8TDDqwTyU28nwYDKATdP+ap/B7K1u8QXs7O7QAg=
   -----END CERTIFICATE-----
    2 s:O = Istio, CN = Root CA
      i:O = Istio, CN = Root CA
   -----BEGIN CERTIFICATE-----
   MIIFCTCCAvGgAwIBAgIJAJp8QkLGogzSMA0GCSqGSIb3DQEBCwUAMCIxDjAMBgNV
   ...
   OiZVWpAKDVf1mzEDda7uj8aDLRSBhRZhfwY8iF4G93CvYpjKsxLO8jRW5N3c
   -----END CERTIFICATE-----
    3 s:O = Istio, CN = Root CA
      i:O = Istio, CN = Root CA
   -----BEGIN CERTIFICATE-----
   MIIFCTCCAvGgAwIBAgIJAJp8QkLGogzSMA0GCSqGSIb3DQEBCwUAMCIxDjAMBgNV
   ...
   OiZVWpAKDVf1mzEDda7uj8aDLRSBhRZhfwY8iF4G93CvYpjKsxLO8jRW5N3c
   -----END CERTIFICATE-----
endpoints验证
当查看istio集群endpoints时,可以明显看到helloworld.sample.svc.cluster.local的svc地址的5000端口有两个pod ip。这两个ip分别是集群k1个k2的helloworld pod ip。
$ kubectl --kubeconfig=/root/.kube/istio-cluster-002 pc endpoint helloworld-v2-76c59fb8c-brztk -n sample --port 5000
ENDPOINT               STATUS      OUTLIER CHECK     CLUSTER
127.0.0.1:5000         HEALTHY     OK                inbound|5000||
172.31.23.141:5000     HEALTHY     OK                outbound|5000||helloworld.sample.svc.cluster.local
172.31.7.36:5000       HEALTHY     OK                outbound|5000||helloworld.sample.svc.cluster.local
跨集群验证
#!/bin/sh
hellworld_url='https://raw.githubusercontent.com/istio/istio/release-1.9/samples/helloworld/helloworld.yaml'
sleep_url='https://raw.githubusercontent.com/istio/istio/release-1.9/samples/sleep/sleep.yaml'

k1='kubectl --kubeconfig=/root/.kube/istio-cluster-001'
k2='kubectl --kubeconfig=/root/.kube/istio-cluster-002'
# 部署环境准备工作
$k1 create ns t-mtls
$k1 create ns t-nomtls
$k2 create ns t-mtls
$k2 create ns t-nomtls

$k1 label ns t-mtls istio-injection=enabled
$k1 label ns t-nomtls istio-injection=enabled
$k2 label ns t-mtls istio-injection=enabled
$k2 label ns t-nomtls istio-injection=enabled

$k1 apply -f $hellworld_url -n t-mtls -l version=v1
$k1 apply -f $hellworld_url -n t-nomtls -l version=v1
$k1 apply -f $sleep_url -n t-mtls
$k1 apply -f $sleep_url -n t-nomtls
$k1 apply -f $hellworld_url -n t-mtls -l service=helloworld
$k1 apply -f $hellworld_url -n t-nomtls -l service=helloworld

$k2 apply -f $hellworld_url -n t-mtls -l version=v2
$k2 apply -f $hellworld_url -n t-nomtls -l version=v2
$k2 apply -f $sleep_url -n t-mtls
$k2 apply -f $sleep_url -n t-nomtls
$k2 apply -f $hellworld_url -n t-mtls -l service=helloworld
$k2 apply -f $hellworld_url -n t-nomtls -l service=helloworld
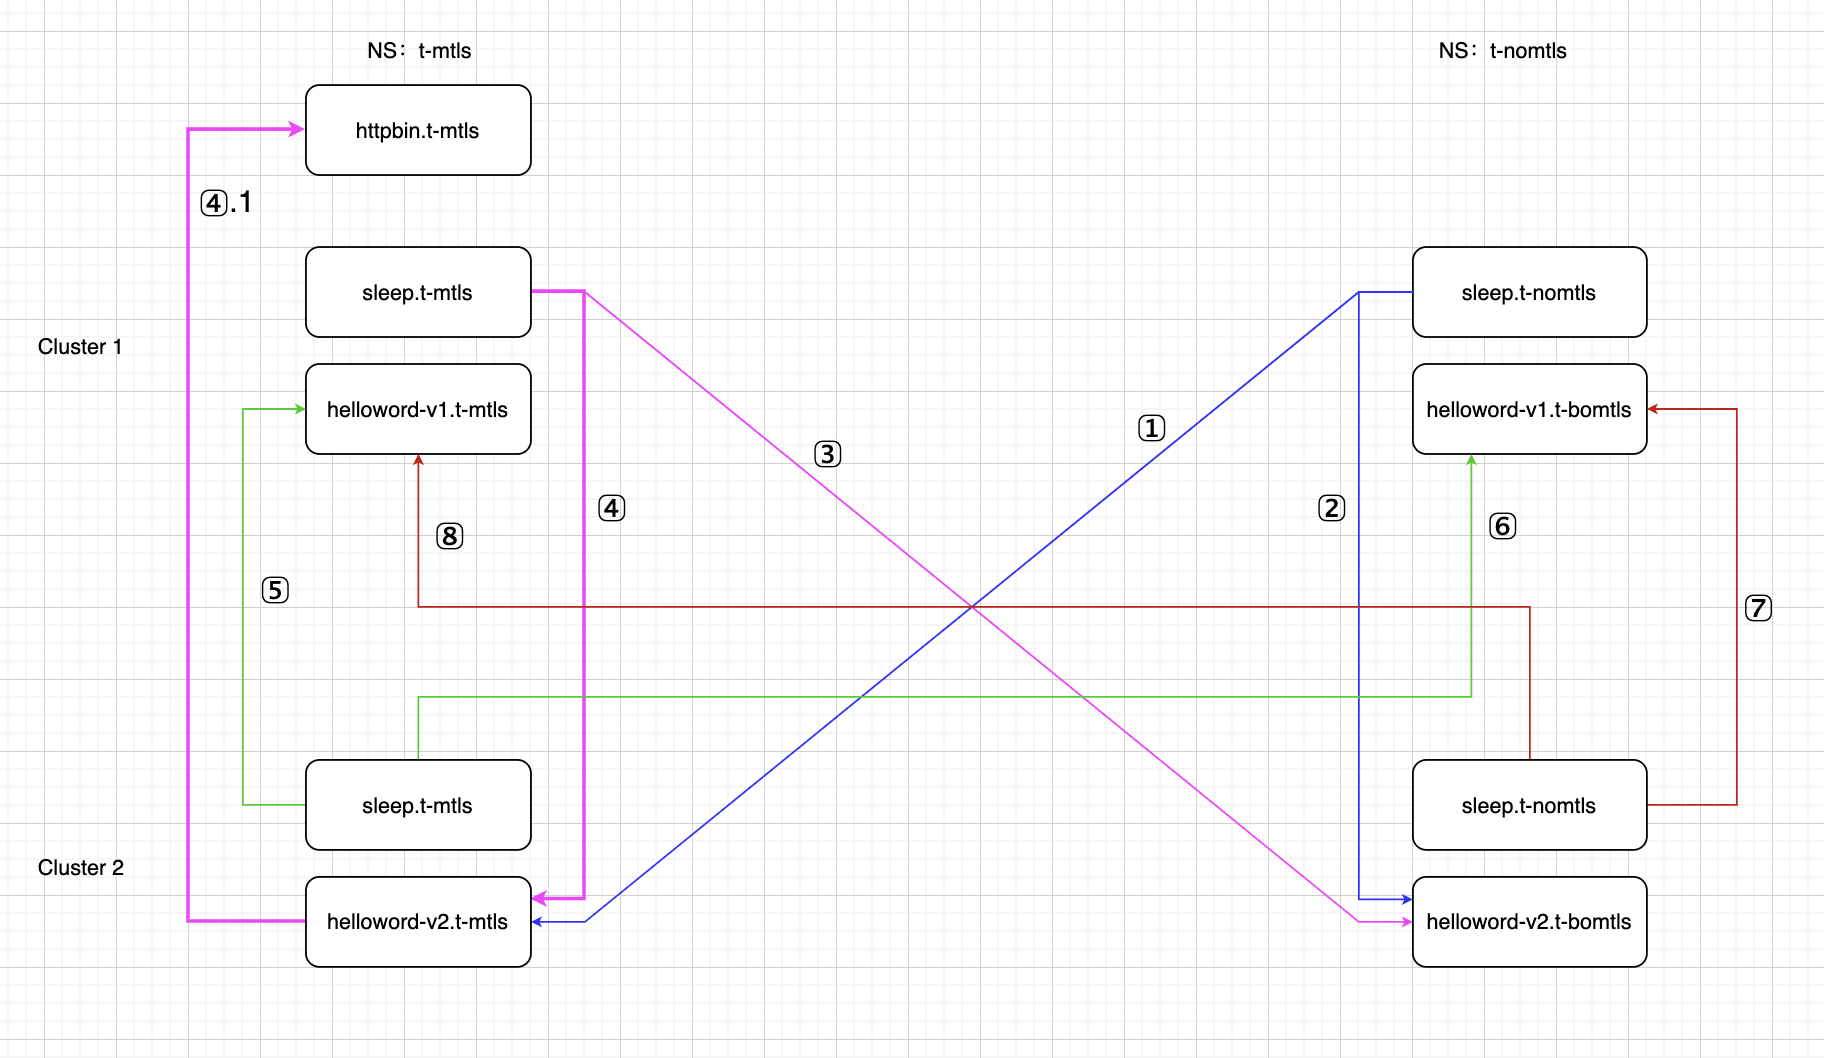
通过上面的步骤,我们可以验证一个跨集群调度问题。如上图1-8种请求是否都通过?
-
结论1:在使用默认PeerAuthentication的情况下,以上8种结果均能实现跨集群调度。 4.1过程表示cluster1的sleep服务请求cluster2的helloworld服务,然后helloworld服务在请求cluster1里的httpbin服务 即:每个namespace下的sleep服务都能通过helloword.访问v1、v2版本的hellworld程序 -
结论2:在两个集群的t-mtls名称空间下开启STRICT的PeerAuthentication配置情况下, 以上8种结果也均能实现跨集群调度。 -
结论3:当在集群t-nomtls名称空间下DIABLE TLS。(禁止yaml参考最后), t-nomtls名称空间下的sleep pod无法请求helloworld服务。 -
最后:无sideCar的Pod无法实现跨集群调度,只能调度本集群存在的服务,不存在则请求失败。
结论2和结论3开启和关闭的pa内容
#!/bin/sh
# 结论2 开启STRICT的配置文件
allow-mtls() {
kubectl --kubeconfig=/root/.kube/istio-cluster-001 apply -f - <<EOF
apiVersion: "security.istio.io/v1beta1"
kind: "PeerAuthentication"
metadata:
  name: allow-mtls
  namespace: t-mtls
spec:
  mtls:
    mode: STRICT
EOF

kubectl --kubeconfig=/root/.kube/istio-cluster-002 apply -f - <<EOF
apiVersion: "security.istio.io/v1beta1"
kind: "PeerAuthentication"
metadata:
  name: allow-mtls
  namespace: t-mtls
spec:
  mtls:
    mode: STRICT
EOF
}

# 结论3 关闭t-nomtls下的mtls认证需要的配置文件
disable-mtls(){
kubectl --kubeconfig=/root/.kube/istio-cluster-001 apply -f - <<EOF
apiVersion: "security.istio.io/v1beta1"
kind: "PeerAuthentication"
metadata:
  name: disable-mtls
  namespace: t-nomtls
spec:
  mtls:
    mode: DISABLE
EOF

kubectl --kubeconfig=/root/.kube/istio-cluster-001 apply -f - <<EOF
apiVersion: "networking.istio.io/v1alpha3"
kind: "DestinationRule"
metadata:
  name: "default"
  namespace: "t-nomtls"
spec:
  host: "*.local"
  trafficPolicy:
    tls:
      mode: DISABLE
EOF

kubectl --kubeconfig=/root/.kube/istio-cluster-002 apply -f - <<EOF
apiVersion: "security.istio.io/v1beta1"
kind: "PeerAuthentication"
metadata:
  name: disable-mtls
  namespace: t-nomtls
spec:
  mtls:
    mode: DISABLE
EOF

kubectl --kubeconfig=/root/.kube/istio-cluster-002 apply -f - <<EOF
apiVersion: "networking.istio.io/v1alpha3"
kind: "DestinationRule"
metadata:
  name: "default"
  namespace: "t-nomtls"
spec:
  host: "*.local"
  trafficPolicy:
    tls:
      mode: DISABLE
EOF
}

$1
「真诚赞赏,手留余香」
 云原生与运维
真诚赞赏,手留余香
使用微信扫描二维码完成支付

comments powered by Disqus